JavaScript and the DOM: Interacting with the Browser Like a Pro
Elevate Your Web Skills: Learn Dynamic Web Interactions with JavaScript and the DOM

I'm a passionate backend dev
Hey there! Ever clicked a button on a website and noticed how the page updates without refreshing? Or wondered how text or colors change right before your eyes? That’s all thanks to something called the DOM(Document Object Model), and JavaScript is what brings it to life. Don’t let the fancy name scare you—it’s simpler than it seems, and honestly, kind of fun to mess with. Let’s dive in and figure it out together!
In this article, we’ll explore:
What the DOM is and why it’s like a family tree 🌳
How JavaScript talks to the DOM to make things happen
How to select and change HTML elements (like a boss)
How to dynamically update styles and content
How to create and remove elements with JavaScript
By the end, you’ll be able to make your web pages dance 🕺 to your JavaScript tunes. Let’s dive in!
Understanding the DOM: How JavaScript Interacts with HTML
Imagine your web page is a family tree. At the top, you have the grandparents (<html>), then the parents (<head>, <body>), and finally the kids (<div>, <p>, <img>, etc.). Each family member (or HTML element) has a relationship with others—parents, children, and siblings. This tree-like structure is the DOM.
The DOM is like a map of your web page that JavaScript can read and edit. It turns your HTML into a bunch of objects that you can manipulate. Want to change the text in a paragraph? JavaScript can find that paragraph in the DOM and update it. Want to add a new button? JavaScript can create it and add it to the family tree. Cool, right?
Here is a simple tree diagram to visualise it:
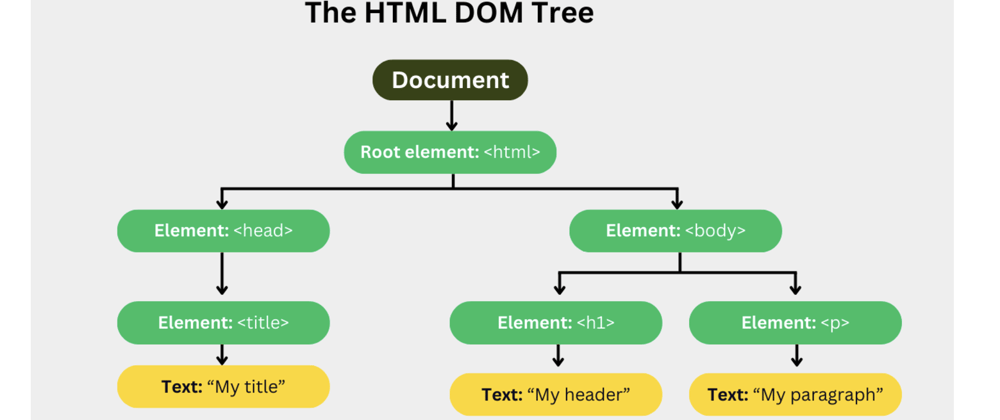
In this tree, <html> is the root, and everything else branches out from there. JavaScript can climb this tree, find any element, and make changes on the fly.🧗🏻♂️
DOM Manipulation: Selecting and Modifying HTML Elements
Alright, let’s get hands-on. First, we need to learn how to select elements in the DOM. Think of it like finding a specific family member in the tree.
JavaScript gives us several ways to do this:
document.getElementById('id'): Finds an element by its unique ID.document.getElementsByClassName('class'): Finds elements by their class name.document.getElementsByTagName('tag'): Finds elements by their tag (like<div>or<p>).document.querySelector('selector'): The Swiss Army knife—finds elements using CSS selectors (like#id,.class, ortag).
Once we’ve selected an element, we can modify it. For example, we can change its text or HTML content.
Let’s try it! Suppose we have this HTML:
<h1 id="title">Hello, World! This is Suman!</h1>
We can change it using JavaScript like this:
const title = document.getElementById('title');
title.textContent = 'Hello, World! I am the Reader';
Boom! The heading now says “ Hello, World! I am the Reader “ instead of “ Hello, World! This is Suman! “🥳
Quick Tip: Use textContent to change text and innerHTML to change MTML inside an element.
Changing Styles and Content Dynamically with JavaScript
Now, let’s make things look fancy. JavaScript can change the styles of elements dynamically. Every element has a style property that lets you tweak its CSS.
For example, let’s change the color and size of our heading:
title.style.color = 'blue';
title.style.fontSize = '50px';
Just like that, our heading is now blue and bigger! You can change any CSS property this way—background color, padding, borders, you name it.
But wait, there’s more! You can also update content based on user actions. Let’s say you have a button that, when clicked, changes the text of a paragraph.
Here’s the HTML:
<button id="magicButton">Click Me!</button>
<p id="message">Nothing yet...</p>
And now the JavaScript:
const button = document.getElementById('magicButton');
const message = document.getElementById('message');

button.addEventListener('click', () => {
  message.textContent = 'You clicked the button! 🎉';
});
Now, every time you click the button, the paragraph updates. It’s like magic, but better—it’s code! ✨
Creating and Removing Elements in the DOM with JavaScript
Sometimes, you need to add new elements or remove old ones. JavaScript can do that too!
Creating Elements
To create a new element, use document.createElement('tag'). Then, you can add it to the DOM using methods like appendChild().
Let’s create a new paragraph and add it to a <div>:
<div id="container"></div>
const container = document.getElementById('container');
const newParagraph = document.createElement('p');
newParagraph.textContent = 'I’m a new paragraph!';
container.appendChild(newParagraph);
Now, the <div> has a shiny new paragraph inside it.
Removing Elements
To remove an element, use removeChild(). You need to select the parent and tell it which child to remove.
Let’s remove the paragraph we just added:
container.removeChild(newParagraph);
Boom! The paragraph is gone.
Visualizing the Magic: Before and After
To see the DOM in action, let’s look at a quick before-and-after example.
Before JavaScript:
<body>
  <h1 id="title">Hello, World! This is Suman!</h1>
  <button id="magicButton">Click Me!</button>
  <p id="message">Nothing yet...</p>
</body>
After JavaScript (after clicking the button):
The heading says "Hello, World! I am the Reader" in blue, 50px font.
The paragraph says "You clicked the button!".
Here’s a rough sketch of what it might look like:
Before:
Hello, World! This is Suman!

[Click Me!]

Nothing yet...
After:
Hello, World! I am the Reader (in blue, bigger font)

[Click Me!]

You clicked the button! 🎉
See how JavaScript transformed the page without reloading? That’s the power of the DOM! 💪
In conclusion, mastering the DOM with JavaScript opens up a world of possibilities for creating dynamic and interactive web pages. By understanding how to navigate and manipulate the DOM, you can transform static HTML into a lively, responsive experience for users. Whether you're updating content, styling elements, or adding new features on the fly, the skills you've learned here will empower you to bring your web projects to life.
Ok there you have it! Until next time! 🙌


